
Another addition to the party!
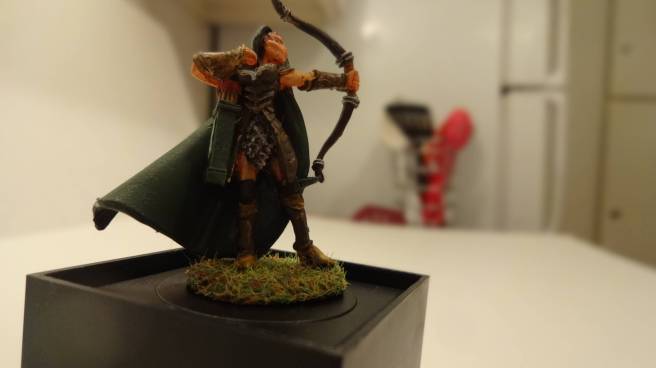
Thia is my second figure for my local D&D party. Thia is an elf, who lost her parents at a young age, and has taken to adventuring to find out what happened to them. She carries with her an antique key that she believes is the answer to what happened to her family.
Well, what does Thia do?
Thia is an Elf Wood Ranger. Rangers are skilled at ranged combat, typically with a longbow, and are outstanding hunters. More specifically, Wood Rangers are adepts at blending into forests, tracking down targets, and interacting with animals. Thia actually has a wolf companion that joins her in her quests, as she can speak directly with him. Rangers do not shy away from a fight, and Thia’s perfect aim with her bow makes her an invaluable member of our adventuring party.

Fiction imitates Fiction
When I spoke with the player that controls Thia, I asked questions about how she should look. Other than what I knew about Wood Rangers and what the figurine had clearly laid out (bow made of wood, leather armor, etc), I didn’t have much information to work on. Luckily, she was able to send me an image of the inspiration for her character, and I was able to work with that.

Just like Helga, the figure is made entirely of pewter and could’ve been painted without any primer. However, I think spraying a coat of Alclad II Black Primer over the entire model followed by a couple light coats of Alclad II White Primer really brings out depth and detail. I typically paint by hand “from the inside, out”.
Flesh and Hair
Though Thia is an elf, I wanted to give her a bit brighter skin tone to match her hair and show that she spends most of her time outside. To accomplish this, I painted her hands, arms, face, and thighs with a base coat of Vallejo Model Color Sunny Skin Tone. I wanted to keep her warm appearance, even in the highlights, so I mixed a 50/50 blend of Vallejo Model Color Orange Brown and Salmon which I painted on the tops of her arms, hands, and around her cheekbones, nose, and chin. To restore the depth of the features, I applied a Valljeo Ink Skin Wash. Her hair was actually quite simple, a base coat of Vallejo Model Color Orange Brown, followed by a thinned coat of Woodgrain gave it a natural redness.

Cloak
I wanted to avoid brush marks on her cloak as much as possible, so I opted to airbrush the base coat. This turned out to be quite a mistake. I didn’t want to spend a ton of time masking the other parts (such as her face, torso, and bow) and I assumed I could easily paint over any thin overspray. I couldn’t have been more wrong, as flesh colors tend to be rather transparent compared the opaque green I used. This forced me to do much more work, rather than saving me some.
The base coat was built up with light passes of Vallejo Model Color German WWII Green Camouflage. I felt that this green was bright enough to look good, but also close to a color that could actually be used to conceal yourself in a forest. After the base coat had dried, I mixed an 50/50 blend of the base color and Valljeo Model Color Park Green as a highlight. Applying this was easy, as I took a small brush and just dragged it along the edges of the cloak where light would hit it. For shadows, I used a similar method. Mixing a 50/50 of the base coat and Vallejo Model Color Dark Green, I painted this into creases, under her hood, and near her torso. To add variety, I painted the border of her hood with Vallejo Model Color Pale Gray, and highlighted the center dots with White.

Leather Armor
I didn’t quite get the results I wanted, but I feel like it turned out looking pretty good. For dark leather armor (torso, shin guards) I started with a base coat of Vallejo Model Color Chocolate Brown. I followed this up by highlighting edges using a 50/50 blend of Flat Earth and Japanese WWII Uniform. Afterwards, I applied a wash of Vallejo Model Color Smoke, but not thinned too much. This gave a more “real” wear to the leather.
Light leather (boots, bracers, knee guards) were painted with a base coat of Dark Sand. I highlighted the creases and tops of the bracers with 50/50 Dark Sand and Japanese WWII Uniform. This time, for the wash, I mixed some Smoke with Woodgrain and applied this over the entire base coat (rather than in creases only) and I think this gave it a more muddled appearance.
For the chain mail “skirt”, I applied a base layer of MiG Gunmetal, followed by some drybrushing of Vallejo Model Air Steel. The Eagle crest on the torso is also Steel.
Bow and Quiver
I opted to make the quiver the same colors as the cloak, since they could be made out of the same material. I highlighted the edges of the quiver in the same way I did for the cloak. Arrows were tipped with Tamiya Red, and the shafts were Vallejo Model Color German Medium Brown.
Her longbow had a base coat of Vallejo Model Color German Dark Brown, and I applied streaks of Smoke to this coat to get a more textured feel. The grip used Vallejo Model Color Leather Brown, and accents were done with Vallejo Model Air Steel.

Base and Finish
I wanted to go simple for the base, so I simply used Vallejo Model Color Flat Earth. After the paint had dried, I used an 80/20 mix of water and Elmer’s Craft Glue as a fixer. Next, I put some grass flocking through a metal strainer, and allowed the grass to dry.
The entire figure was then sprayed with Model Master Clear Gloss Lacquer to build up a protective coat, and allow a black wash to flow. After a few passes, and about 12 hours of drying time, I added the Model Master Black Enamel wash to all creases on the figure. This is what truly brings it “to life”. To complete the figure, I sprayed it with Model Master Clear Flat Lacquer.
Conclusion
This figure was definitely a learning experience. I will take the time to mask future figures when airbrushing, and spend a bit more time with my bases. Thia looks great on the battlefield standing behind Helga.
